Your cart is empty
Get Pumped With Centrifugal Pump Know How
Get Pumped With Centrifugal Pump Maintenance Tips
Nobody puts much thought into their sprayer pump. The pump is the heart of any sprayer and performs day in and day out without trouble or fanfare. When a pump does fail it typically happens during a critical time, multiplying costs beyond just fixing or replacing the pump. The added downtime creates lost revenue, reduced efficacy, and increased stress.
The good news is that with proper care and maintenance, the average life span of a Hypro Cast Iron Housing Centrifugal Pump with a Life Guard Seal is 1700 to 2500 machine hours, which for most users is 800-1500 spray hours. As you will read below there are many factors that effect pump longevity. The even better news is that there are pump upgrade options available to make maintenance easier and extend the service life of your sprayer pump and prevent downtime during critical application windows.
Typical Pump Failures and How to Prevent Them
Run Dry Failures
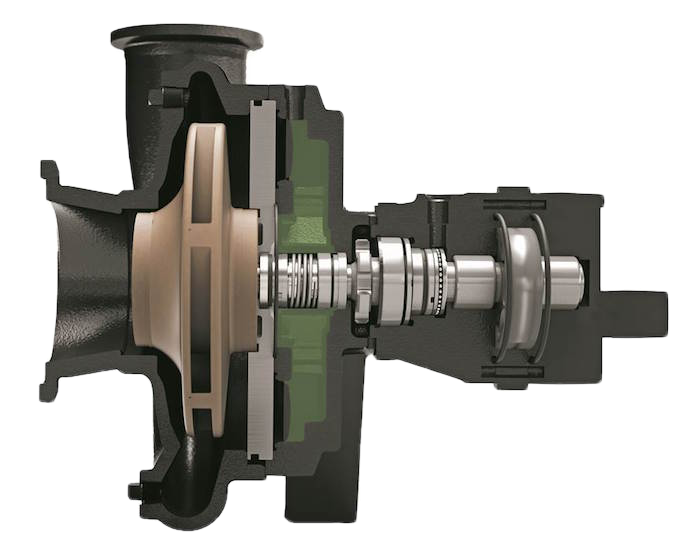
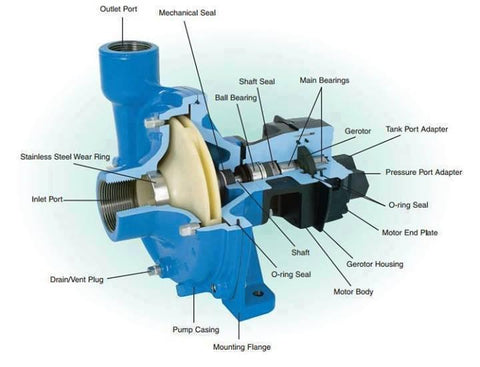
The mechanical seal of the solution pump allows the shaft to rotate and power the impeller while keeping fluid in the pump. This seal needs the solution fluid to cool the seal as it works. When the pump is run with too little or no solution the seal will overheat and fail causing solution to leak from the pump. Damage or failure can also occur if too much foam or air is drawn into the pump causing cavitation. The impeller and bearings can be damaged by a slow or fast pump seal failure due to run dry conditions.
How to prevent Run Dry Failures?
Train operators on how solution pump switches and solution valves work
Install a pressure gauge off the pump to where it can be seen while filling
Use a pump vent line for easier priming to prevent air lock
Use defoaming agent and turn solution tank agitation off soon enough to prevent foaming the solution in the tank.
Try to keep a constant solution supply to the pump on uneven terrain.
When replacing the seal ensure that shaft is smooth and there is no play in the bearings.
Upgrade the seal type on your pump to a Life Guard Silicone Carbide Seal for longer seal life or Force Field Wet seal technology for unlimited run dry protection

Slip Stick and Chemical Build Up Failures
Another very common condition that can cause the pump seal to fail immediately or over time is chemical buildup or leaving product stationary in the pump too long. When the pump is started the seal is "stuck" this can either cause immediate seal failure or seal damage and premature failure over time. The impeller and bearings can be damaged by a slow or fast pump seal failure due to slip stick conditions.
Preventing Slip Stick and Chemical Build Up Failures
Flush freshwater through the pump at the end of each day spraying regardless of what product will be sprayed next
Turn the pump on to circulate product if you have been rained or winded out so there is less settling in the pump
Agitate and mix solutions as well as possible and keep them in suspension.
Upgrade the seal type on your pump to a Life Guard Silicone Carbide Seal for longer seal life or Force Field Wet seal technology to keep the seal clean of contamination.
Impeller Failures
If your solution pump fails to build pressure, vibrates or makes excessive noise there is a possibility that your impeller has become damaged or worn out. Common causes of impeller failure include seal failure, corrosion, Impact of a foreign object, and impeller nut installation issues or failures.
How to prevent and detect impeller failures?
Pump does not achieve rate or pressure desired like it used to
Use strainers when filling the machine or a basket strainer if dumping
in the top of the tank
Strain pond or well water to remove abrasives before they get to the
sprayer pump
Follow the same steps as preventing run dry failures.
When replacing the impeller ensure that seal is intact, shaft is smooth
and there is no play in the bearings.
Use a Nylon, Polypropylene, or GTX impeller for corrosive fluids 
Pump Housing Failures
With proper use and care after many seasons of reliable pump operation you may notice solution dripping from the plugs on the face of the pump housing. The first reaction is to grab the thread sealant and tighten. Over time this process will become more frequent until the threads rust out entirely and the plug cannot be tightened. At this point a tap with a hammer would likely break right through the pump housing. This corrosion can be caused by many things including pump cavitation, abrasive wear, and corrosive materials.
At this point many owners purchase new housings to rebuild the pump. When they open it up and look inside they realize that they are likely looking at the cost and time to install two brand new housings around what look to be worn out internal components. At this point the cost of a brand new pump starts to make a lot of sense compared to rebuilding with new components on top of old ones.
How To Delay Pump Housing Corrosion
Flush freshwater through the pump at the end of each day spraying regardless of what product will be sprayed next
Use winterizer fluid with corrosion inhibitors or propylene glycol based solution to inhibit rust over winter.
Use defoaming agent and turn solution tank agitation off soon enough to prevent foaming the solution in the tank.
Try to keep a constant solution supply to the pump even on uneven terrain.
Exposed steel will rust faster than steel protected by a solution with corrosion inhibitors during the winter months
Use a pump with a stainless steel housing
Bearing Failures
When the pump bearings fail the pump will not be able to operate to specifications and will likely cause other damage to the internal parts of the pump. Failed bearings are often caused by a leaky mechanical seal that allows solution to erode and penetrate the face of the bearing seal causing premature bearing failure. This can often be noticed by a grinding sound from the pump.

General Maintenance and Operational Guidelines For Centrifugal Sprayer Pumps
Flush the solution system with fresh water at least once a day
Circulate solution regularly when rained or winded out to prevent settling in the pump
Use a good quality winterizing fluid with natural or added corrosion inhibitors
Put all products entering the tank through a strainer to minimize wear from abrasion and impact
Pre-mix or slurry dry products before adding them into the sprayer solution system
Deal with Leaks as soon as they are evident to minimize collateral pump damage from seal failure
Ensure all users know to open valves and ensure solution supply before turning the pump on as well as how to turn the pump on to prevent accidental run dry situations.
Pay attention to your pump, if it sounds, feels, or acts different there is likely a problem
Prevent foam in the tank and pump cavitation. Turn your agitation off at roughly a quarter of the solution tank volume remaining. This may vary depending on product sprayed and agitation pressure used.
Add a pump vent line for easier priming and reduce dry run incidents
Run a dead head pressure test once a year, using water set the pump to maximum output, with solution flow turned off and note maximum pressure. It should be near the maximum listed in your pump or sprayer owners manual.
Upgrade to a more durable pump seal or housing material to prevent costly downtime and in season repairs
- Choosing a selection results in a full page refresh.